[5주차] 간단한 iOS앱 만들기 (맛집 앱 1)
스위프트 상속 부모클래스는 하나만 가능
프로토콜 채택 프로토록은 여러개 가능
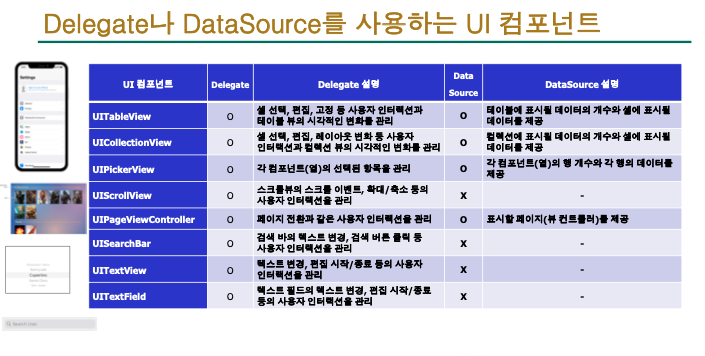
▶ UITableViewDataSource프로토콜 : 선택적 메서드
■ numberOfSections(in:)
테이블뷰에섹션수지정
■ tableView(_:titleForHeaderInSection:)
각섹션의헤더에표시될텍스트지정
■ tableView(_:titleForFooterInSection:)
각섹션의푸터에표시될텍스트지정
■ tableView(_:canEditRowAt:)
셀을 삭제하거나 추가할 때
■ tableView(_:canMoveRowAt:)
셀의순서를변경할때
▶ TableView의 Delegate: UITableViewDelegate프로토콜
■ tableView(_:willDisplay:forRowAt:)
셀이 테이블 뷰에 추가되기 직전에 호출. 셀의 외관을 세부적으로 조정
■ tableView(_:didSelectRowAt:)
사용자가 특정 셀을 선택했을 때 호출. 셀 선택 시 실행할 동작을 정의
■ tableView(_:heightForRowAt:)
각 셀의 높이를 지정. 모든 셀이 동일한 높이가 아닐 경우 유용
■ tableView(_:viewForHeaderInSection:)
각 섹션의 헤더 뷰를 커스터마이징. 커스텀 뷰를 섹션 헤더로 반환
■ tableView(_:heightForHeaderInSection:)
각 섹션 헤더의 높이 지정. 헤더 뷰의 높이를 조정
■ tableView(_:viewForFooterInSection:)
각 섹션의 푸터 뷰를 커스터마이징. 커스텀 뷰를 섹션 푸터로 반환
■ tableView(_:heightForFooterInSection:)
각 섹션 푸터의 높이를 지정. 푸터 뷰의 높이를 조정
■ tableView(_:willBeginEditingRowAt:)
셀이 편집 모드로 들어갈 때 호출. 편집 동작을 시작하기 전에 필요한 작업
■ tableView(_:didEndEditingRowAt:)
셀의 편집이 끝났을 때 호출. 편집 동작이 완료된 후의 처리
- 라이브러리 : 그냥 가져다 쓰는거
- 프레임워크 : 틀이 다 만들어져 있어서 알맞게 기능을 넣어서 사용하는 거
- xcode 테마 바꾸는 법
xcode - Preferences - Themes
- table view controller를 쓰면 더 편하지만

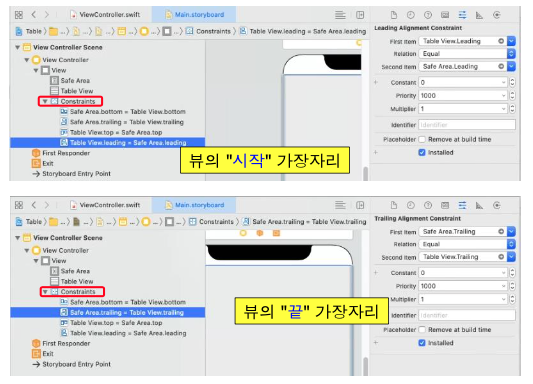
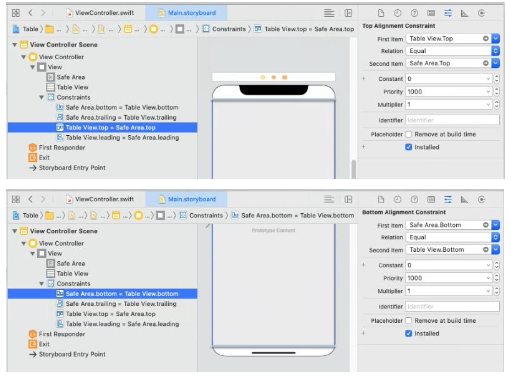
- 화면 전체 채움 방법
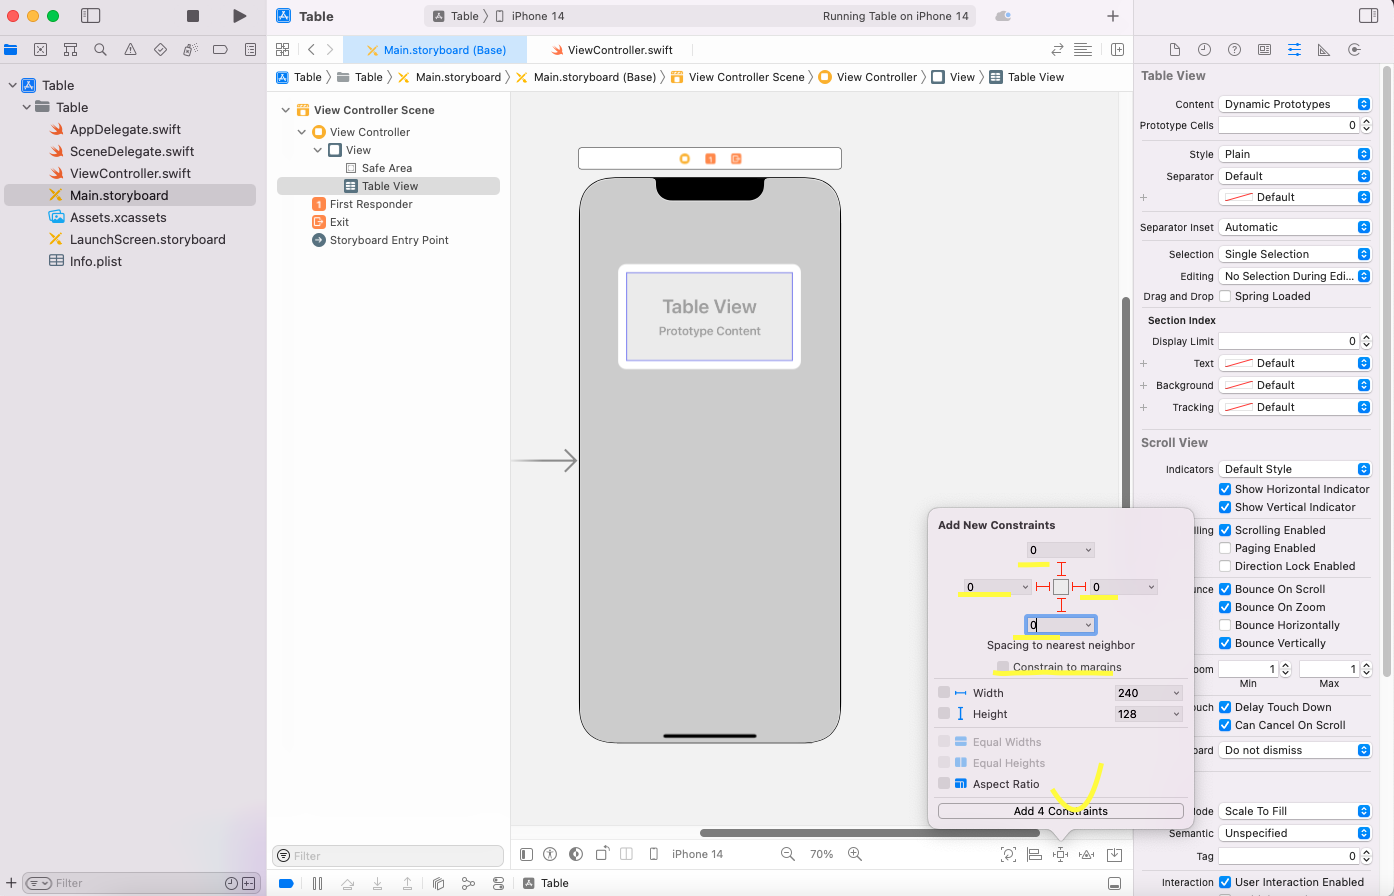
▶ “Constrain to margins”
• 슈퍼뷰에 대한 제약을 슈퍼뷰의 margin(여백)을 사용할지 아니면 edge(가장자리)를 사용할지 결정
전체 채울거기 때문에 체크 해제하기
▶ Safe Area
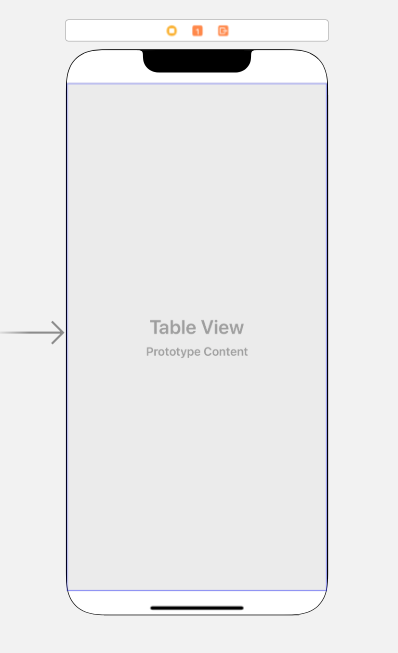
채워진 부붅이 safe area에 해당되는 부분. 컨텐츠가 제대로 보일 수 있는 부분
status bar, 네비게이션 바, home indicator영역을 제외한 부분
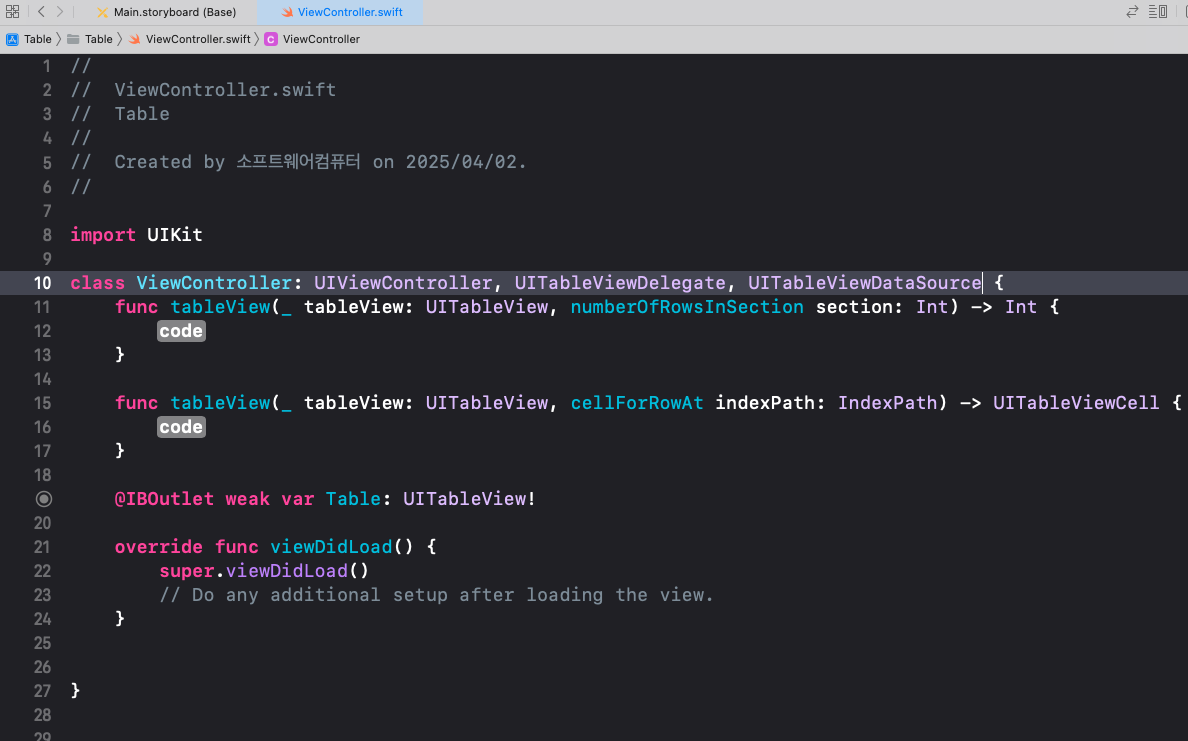
- Assistant editor로 storyboard와 소스 연결
주의: Main.stroryboard선택하고 ctrl+alt+command+enter
control 누른 상태로 convas나 document outline에 있는 table view에서 소스의 class 안쪽으로 드래그
outlet 이름 Table로 설정

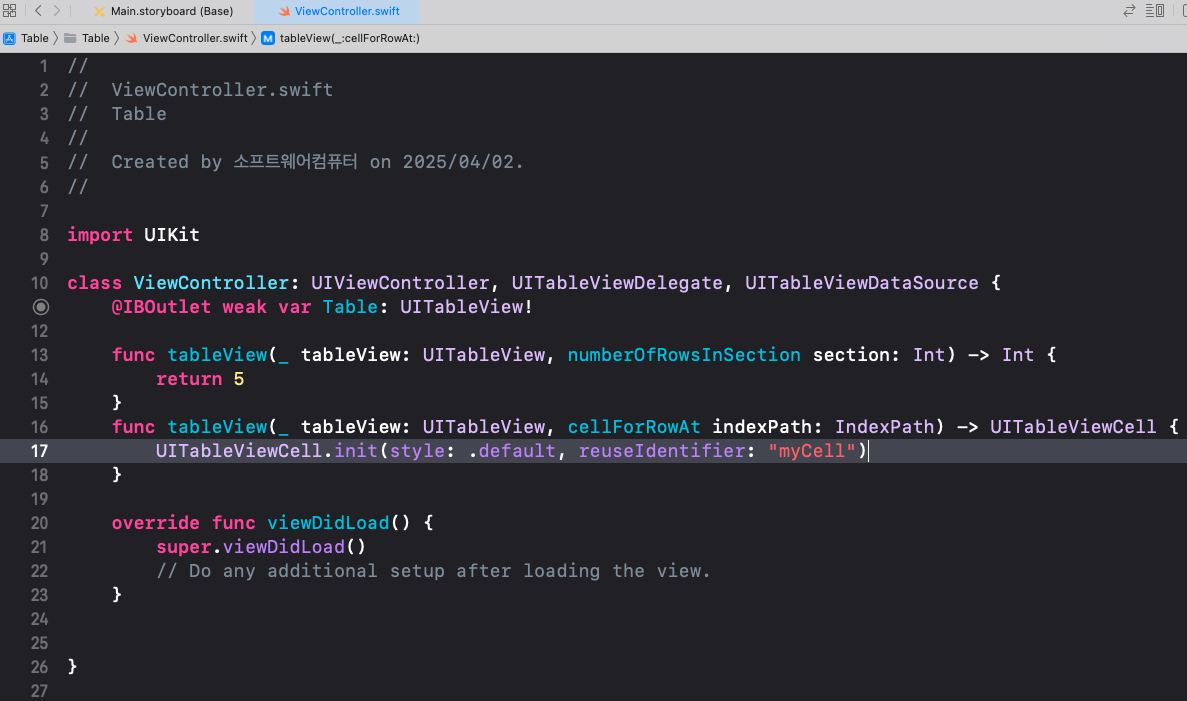
필수메소드를 만들지 않아서 에러 발생
//
// ViewController.swift
// Table
//
// Created by 소프트웨어컴퓨터 on 2025/04/02.
//
import UIKit
class ViewController: UIViewController, UITableViewDelegate, UITableViewDataSource {
func tableView(_ tableView: UITableView, numberOfRowsInSection section: Int) -> Int {
return 5
}
func tableView(_ tableView: UITableView, cellForRowAt indexPath: IndexPath) -> UITableViewCell {
return UITableViewCell()
}
@IBOutlet weak var Table: UITableView!
override func viewDidLoad() {
super.viewDidLoad()
// Do any additional setup after loading the view.
}
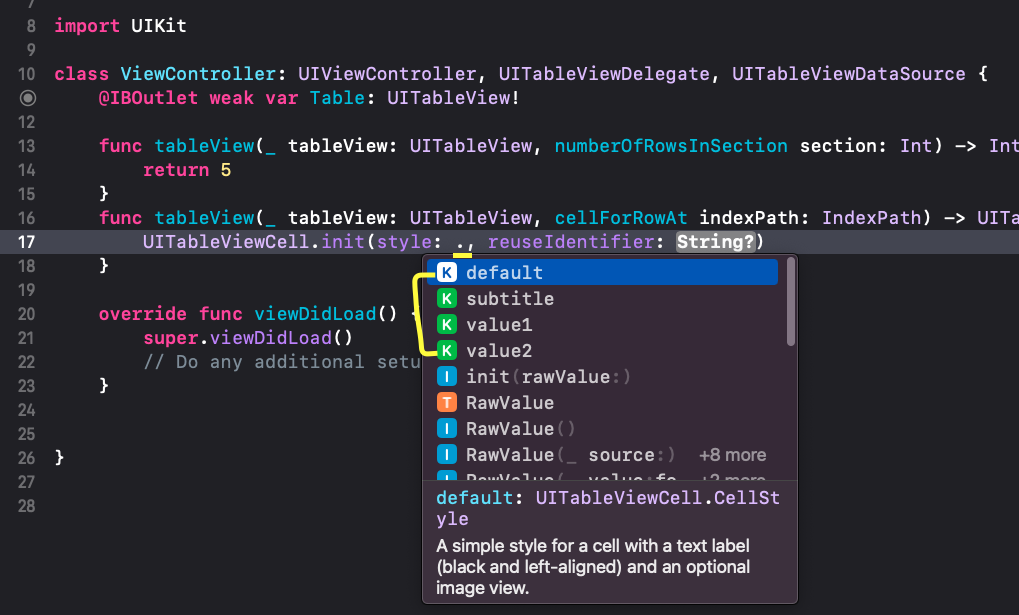
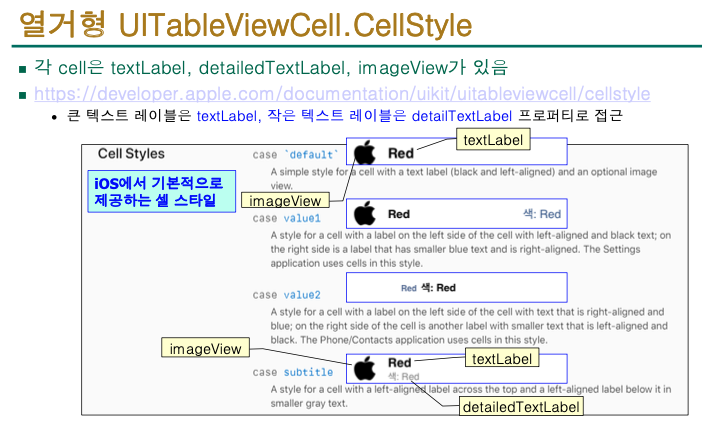
}▶ UITableViewCell.CellStyle 지정
- cell.textLable 을 치려고 하니 경고 문구 뜸
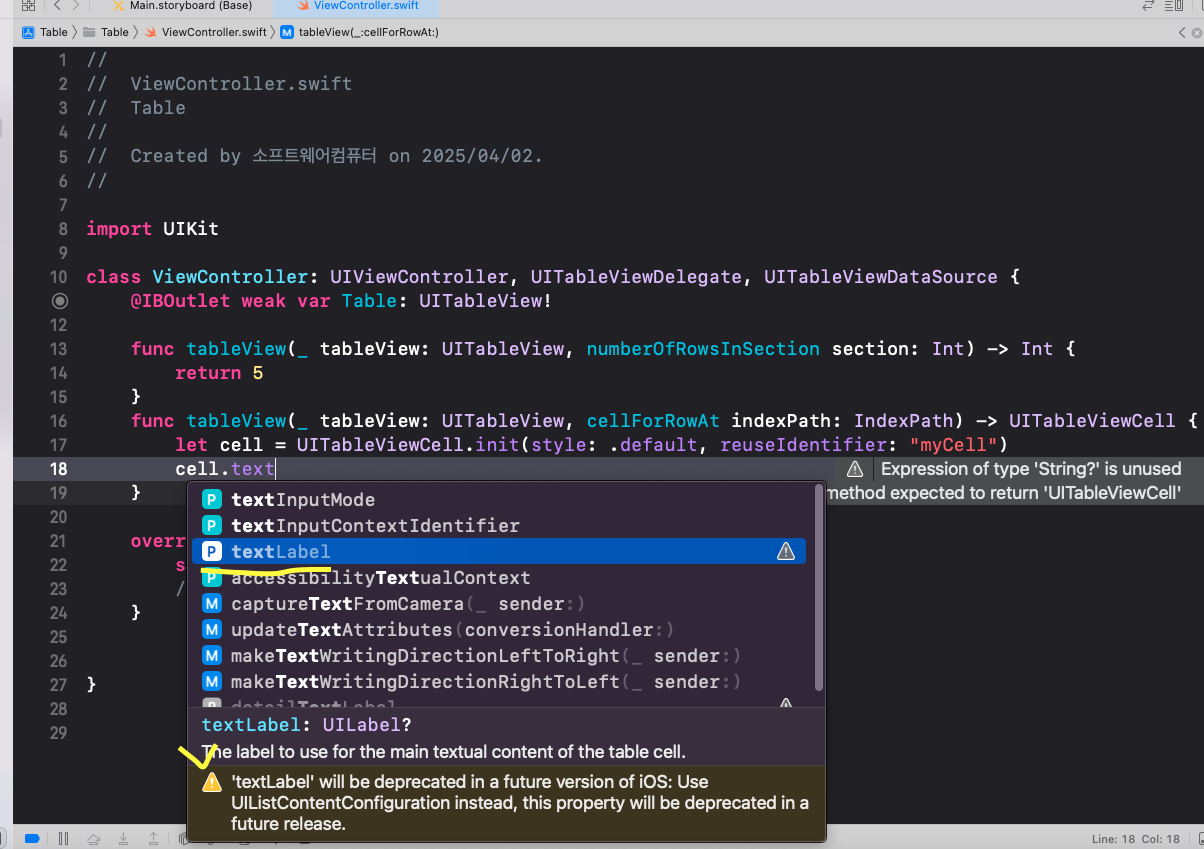

옵셔널 스트링 형이라서 text = 1 이렇게 넣으면 오류 발생함. 그렇기 때문에 아래처럼 적어줘야 함.
//
// ViewController.swift
// Table
//
// Created by 소프트웨어컴퓨터 on 2025/04/02.
//
import UIKit
class ViewController: UIViewController, UITableViewDelegate, UITableViewDataSource {
@IBOutlet weak var Table: UITableView!
func tableView(_ tableView: UITableView, numberOfRowsInSection section: Int) -> Int {
return 5
}
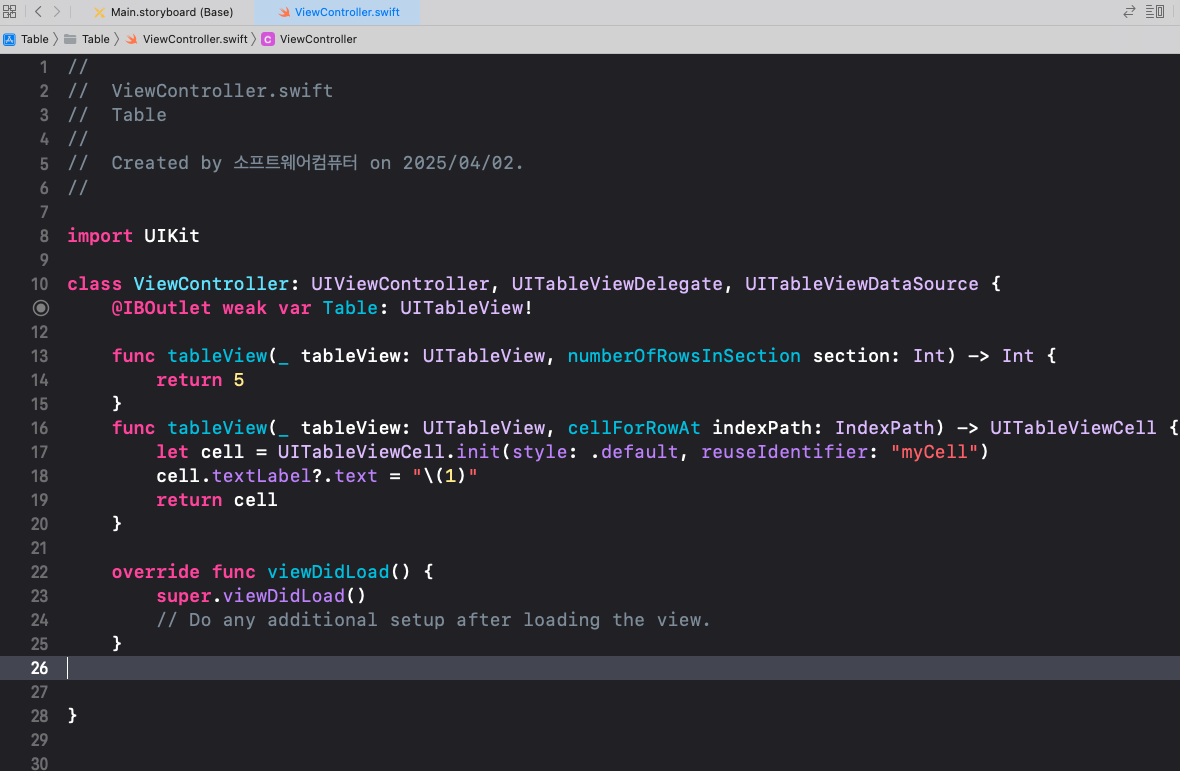
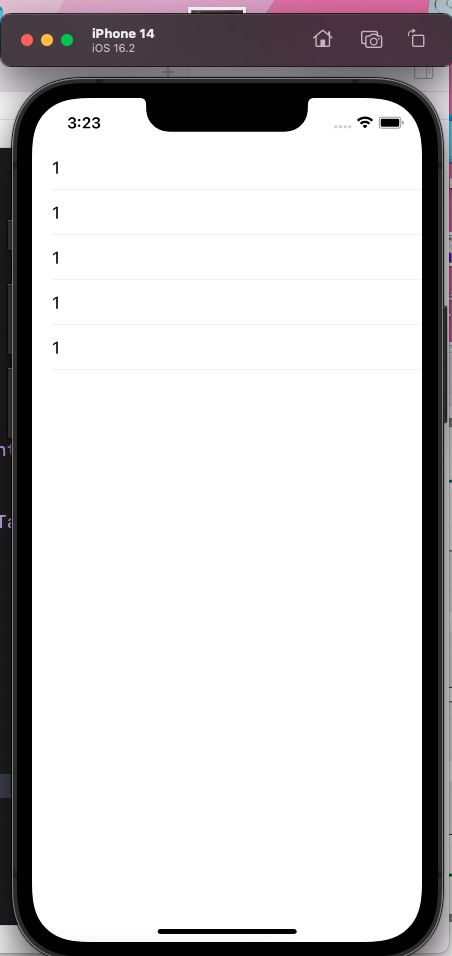
func tableView(_ tableView: UITableView, cellForRowAt indexPath: IndexPath) -> UITableViewCell {
let cell = UITableViewCell.init(style: .default, reuseIdentifier: "myCell")
cell.textLabel?.text = "\(1)"
return cell
}
override func viewDidLoad() {
super.viewDidLoad()
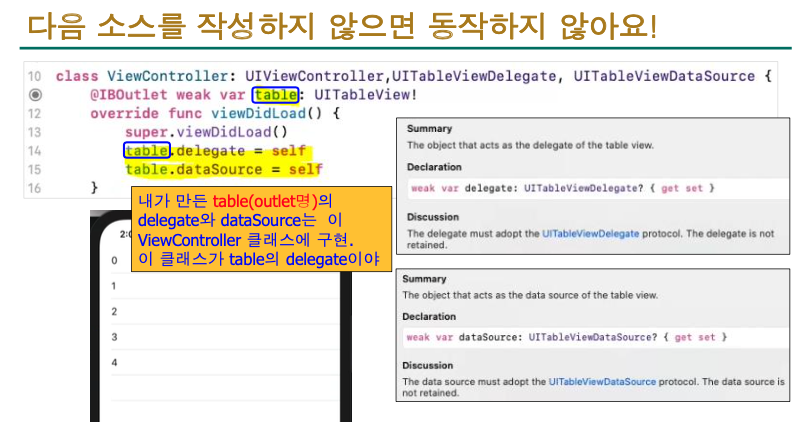
Table.delegate = self
Table.dataSource = self
}
}
- int형을 바꾸는 방법, "\()"
    func tableView(_ tableView: UITableView, cellForRowAt indexPath: IndexPath) -> UITableViewCell {
        let cell = UITableViewCell.init(style: .default, reuseIdentifier: "myCell")
        cell.textLabel?.text = "\(indexPath)"
        return cell
    }
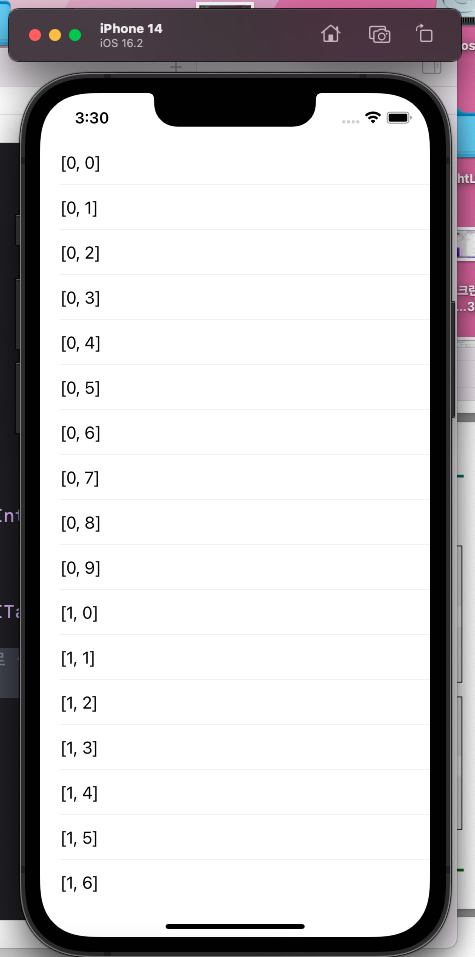
- 섹션과 로우 대로 출력하는 거
func tableView(_ tableView: UITableView, cellForRowAt indexPath: IndexPath) -> UITableViewCell {
        let cell = UITableViewCell.init(style: .default, reuseIdentifier: "myCell")
        cell.textLabel?.text = indexPath.description //스트링형식으로 해서 앞은 섹션 뒤는 로우로 출력 됨. [0, 1]이렇게
        return cell
    }
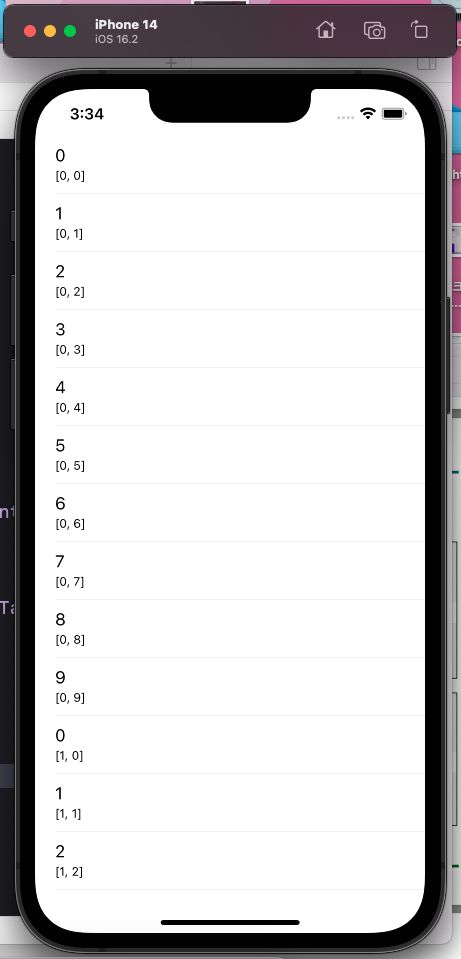
- subtitle로 변경하고 두줄로
//
//  ViewController.swift
//  Table
//
//  Created by 소프트웨어컴퓨터 on 2025/04/02.
//

import UIKit

class ViewController: UIViewController, UITableViewDelegate, UITableViewDataSource {
    @IBOutlet weak var Table: UITableView!

    //섹션 수 정하기 위한 부분
    func numberOfSections(in tableView: UITableView) -> Int {
        return 3 //섹션은 보통 하나임
    }

    //행 수 정하기 위한 부분
    func tableView(_ tableView: UITableView, numberOfRowsInSection section: Int) -> Int {
        return 10
    }

    func tableView(_ tableView: UITableView, cellForRowAt indexPath: IndexPath) -> UITableViewCell {
        let cell = UITableViewCell.init(style: .subtitle, reuseIdentifier: "myCell")
        cell.textLabel?.text = "\(indexPath.row)"
        cell.detailTextLabel?.text = indexPath.description
        return cell
    }

    override func viewDidLoad() {
        super.viewDidLoad()
        Table.delegate = self
        Table.dataSource = self
    }


}
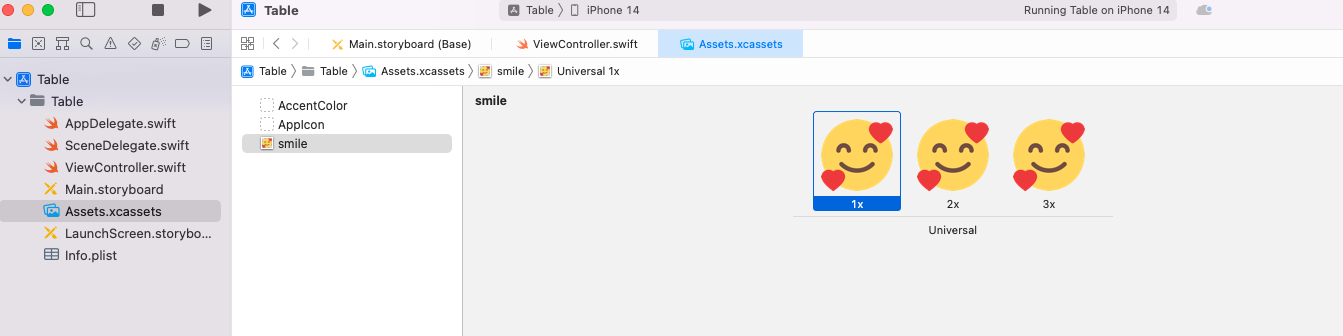
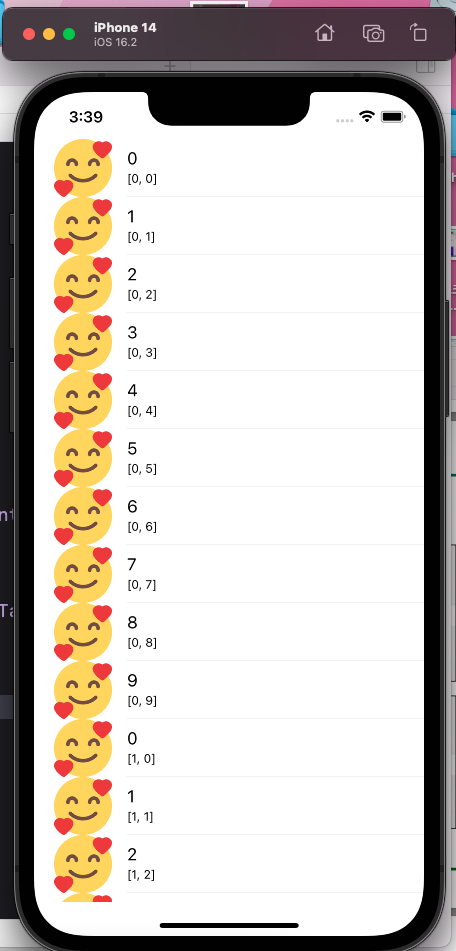
- 이미지 넣기 (알트 + 드래그)
//
//  ViewController.swift
//  Table
//
//  Created by 소프트웨어컴퓨터 on 2025/04/02.
//

import UIKit

class ViewController: UIViewController, UITableViewDelegate, UITableViewDataSource {
    @IBOutlet weak var Table: UITableView!

    //섹션 수 정하기 위한 부분
    func numberOfSections(in tableView: UITableView) -> Int {
        return 3 //섹션은 보통 하나임
    }

    //행 수 정하기 위한 부분
    func tableView(_ tableView: UITableView, numberOfRowsInSection section: Int) -> Int {
        return 10
    }

    func tableView(_ tableView: UITableView, cellForRowAt indexPath: IndexPath) -> UITableViewCell {
        let cell = UITableViewCell.init(style: .subtitle, reuseIdentifier: "myCell")
        cell.textLabel?.text = "\(indexPath.row)"
        cell.detailTextLabel?.text = indexPath.description
        cell.imageView?.image = UIImage(named: "smile.png")
        return cell
    }

    override func viewDidLoad() {
        super.viewDidLoad()
        Table.delegate = self
        Table.dataSource = self
    }


}
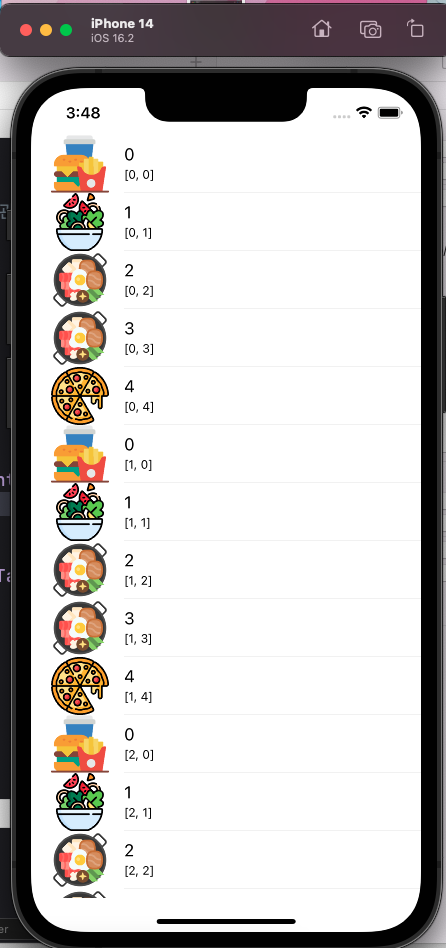
- 각 셀에 다른 이미지 출력하기
//
//  ViewController.swift
//  Table
//
//  Created by 소프트웨어컴퓨터 on 2025/04/02.
//

import UIKit

//이미지 배열 저장
var image = ["1.png", "2.png", "3.png", "4.png", "5.png"] //class안쪽에 넣어도 상관없긴 함. 관리하기 편하려고

class ViewController: UIViewController, UITableViewDelegate, UITableViewDataSource {
    @IBOutlet weak var Table: UITableView!

    //섹션 수 정하기 위한 부분
    func numberOfSections(in tableView: UITableView) -> Int {
        return 6 //섹션은 보통 하나임
    }

    //행 수 정하기 위한 부분
    func tableView(_ tableView: UITableView, numberOfRowsInSection section: Int) -> Int {
        return 5
    }

    func tableView(_ tableView: UITableView, cellForRowAt indexPath: IndexPath) -> UITableViewCell {
        let cell = UITableViewCell.init(style: .subtitle, reuseIdentifier: "myCell")
        cell.textLabel?.text = "\(indexPath.row)"
        cell.detailTextLabel?.text = indexPath.description
        cell.imageView?.image = UIImage(named: image[indexPath.row])
        return cell
    }

    override func viewDidLoad() {
        super.viewDidLoad()
        Table.delegate = self
        Table.dataSource = self
    }


}
- 이름도 숫자가 아닌 이름 넣기
//
//  ViewController.swift
//  Table
//
//  Created by 소프트웨어컴퓨터 on 2025/04/02.
//

import UIKit

//이미지 배열 저장
var image = ["1.png", "2.png", "3.png", "4.png", "5.png"] //class안쪽에 넣어도 상관없긴 함. 관리하기 편하려고
var foodName = ["한식", "중식", "일식", "양식", "집밥"]
var plusName = ["비빔밥, 삼겹살 ...", "짜장면, 마라탕, 마파두부 ...", "초밥, 우동, 라멘 ...", "파스타, 스테이크 ...", "튀김류, 국물류, 밥류 ..."]

class ViewController: UIViewController, UITableViewDelegate, UITableViewDataSource {
    @IBOutlet weak var Table: UITableView!

    //섹션 수 정하기 위한 부분
    func numberOfSections(in tableView: UITableView) -> Int {
        return 6 //섹션은 보통 하나임
    }

    //행 수 정하기 위한 부분
    func tableView(_ tableView: UITableView, numberOfRowsInSection section: Int) -> Int {
        return 5
    }

    func tableView(_ tableView: UITableView, cellForRowAt indexPath: IndexPath) -> UITableViewCell {
        let cell = UITableViewCell.init(style: .subtitle, reuseIdentifier: "myCell")//.init은 없어도 됨.
        cell.textLabel?.text = foodName[indexPath.row]
        cell.detailTextLabel?.text = plusName[indexPath.row]
        cell.imageView?.image = UIImage(named: image[indexPath.row])
        return cell
    }

    override func viewDidLoad() {
        super.viewDidLoad()
        Table.delegate = self
        Table.dataSource = self
    }


}
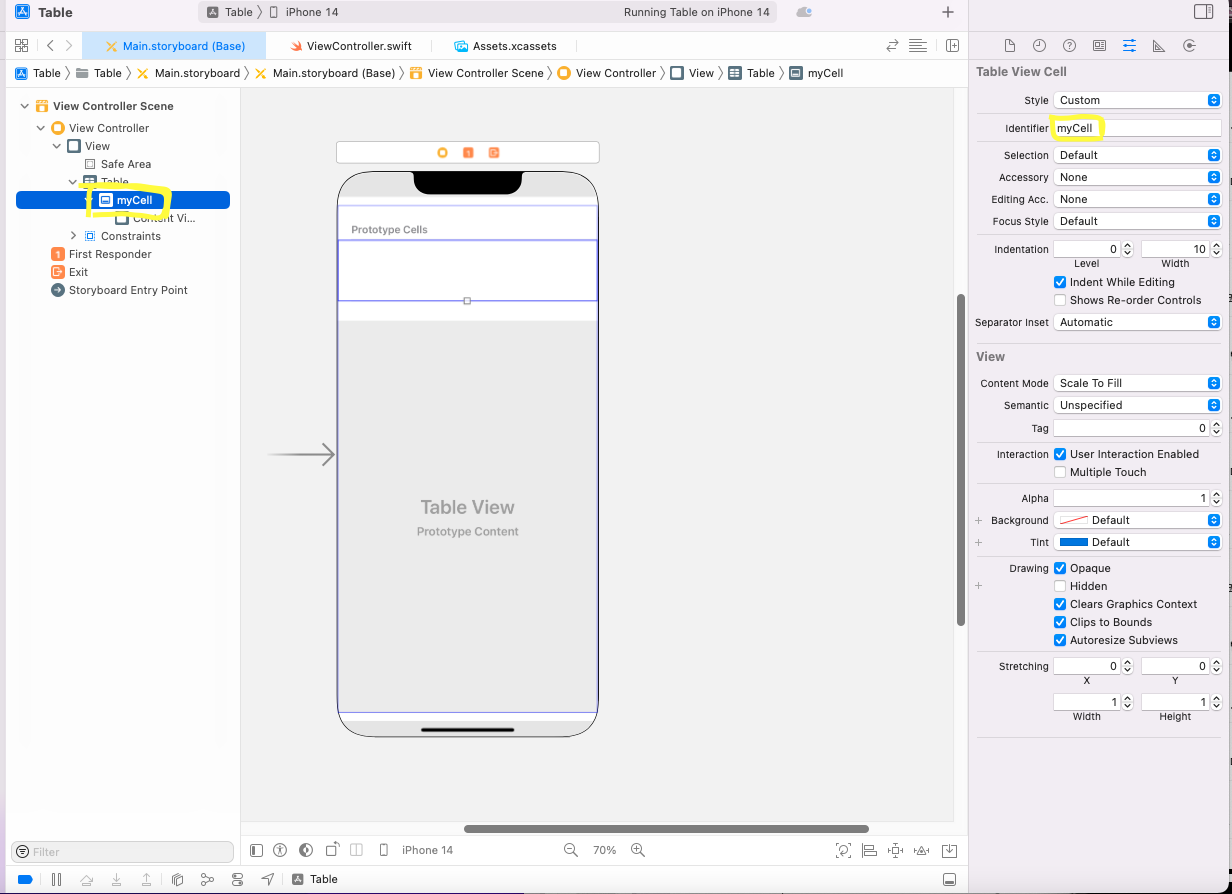
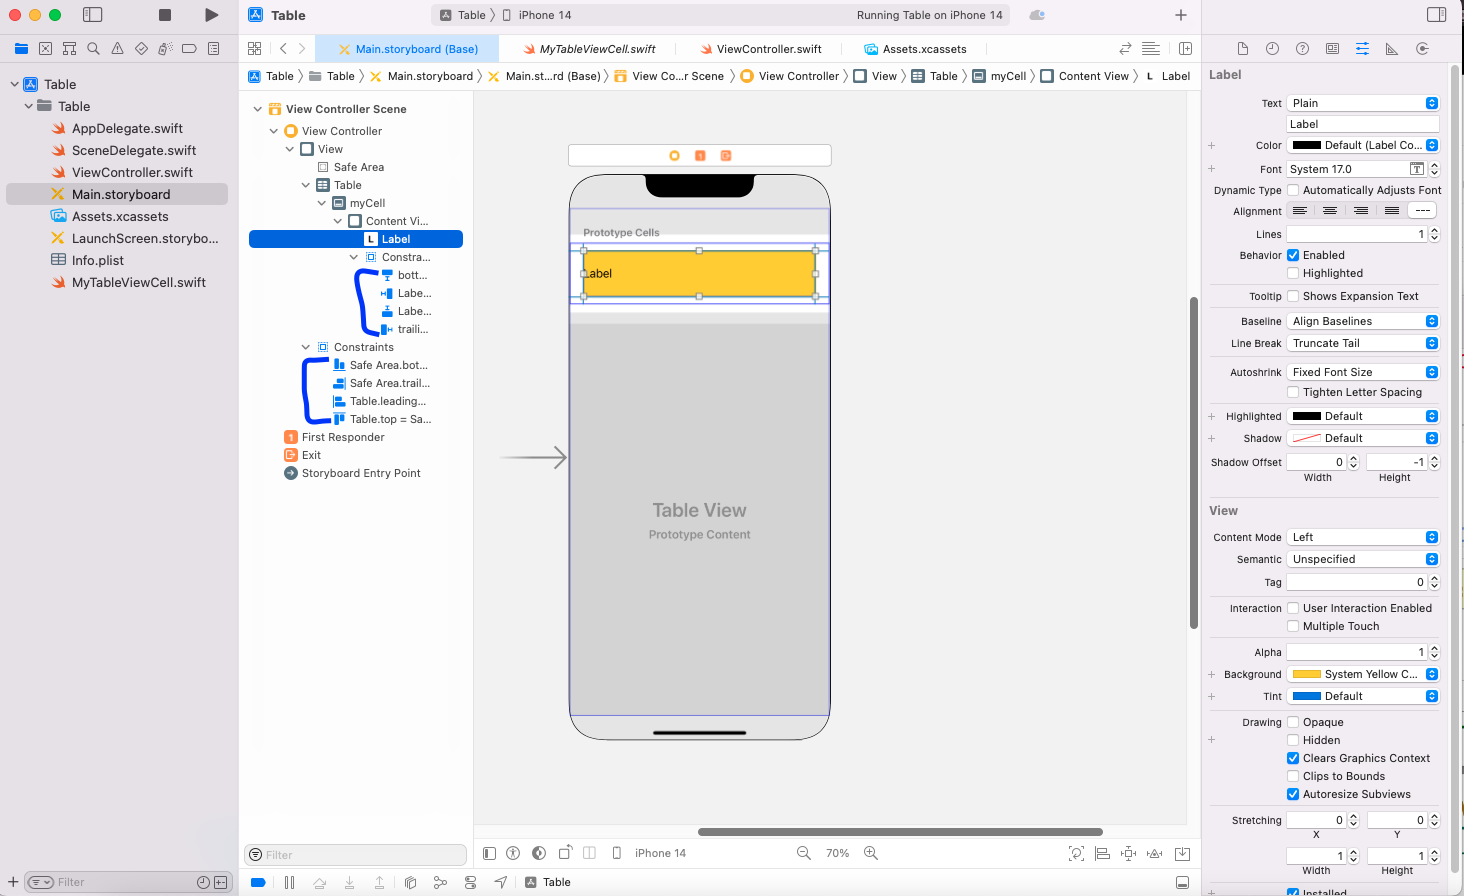
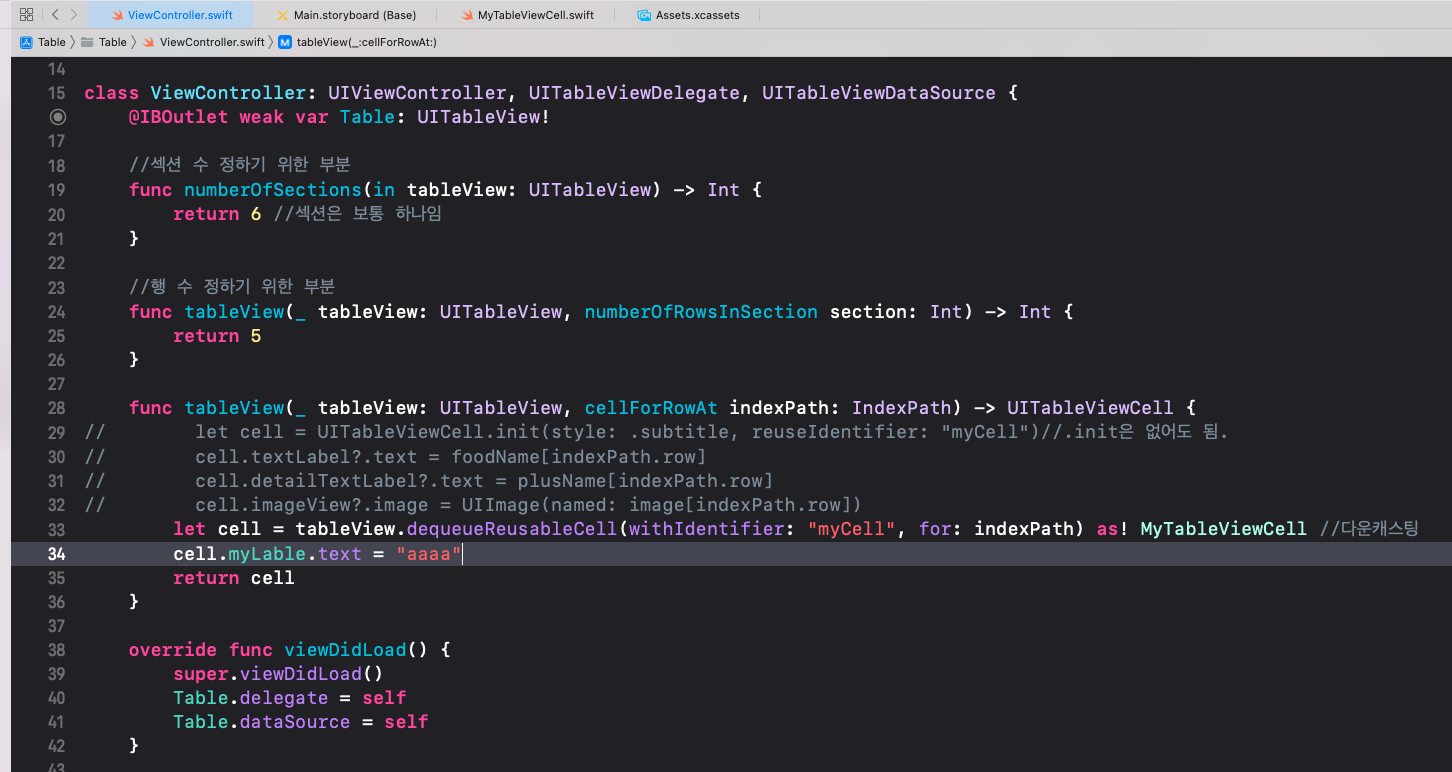
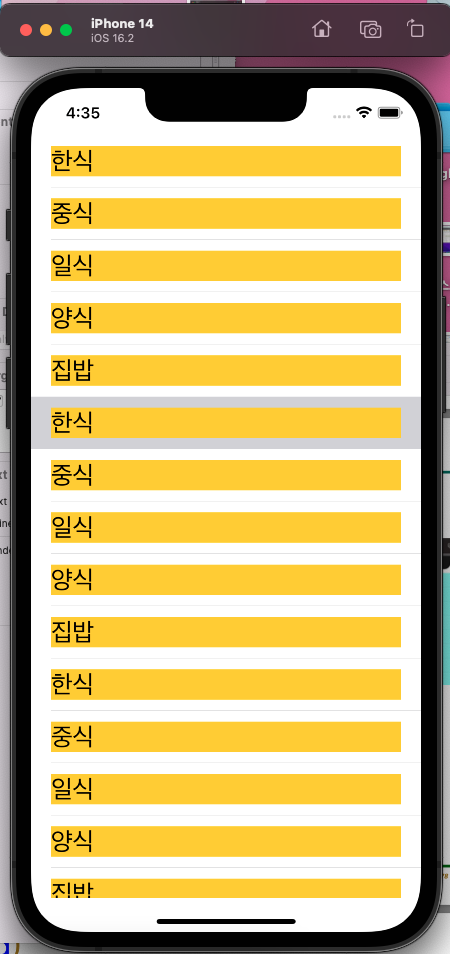
- cell 제작하기
메인스토리보드로 돌아와서 table view cell 을 세이프에리아에 드래그해서 넣기
셀을 만들 때는 identifier가 필요함

- constraints들이 많아짐
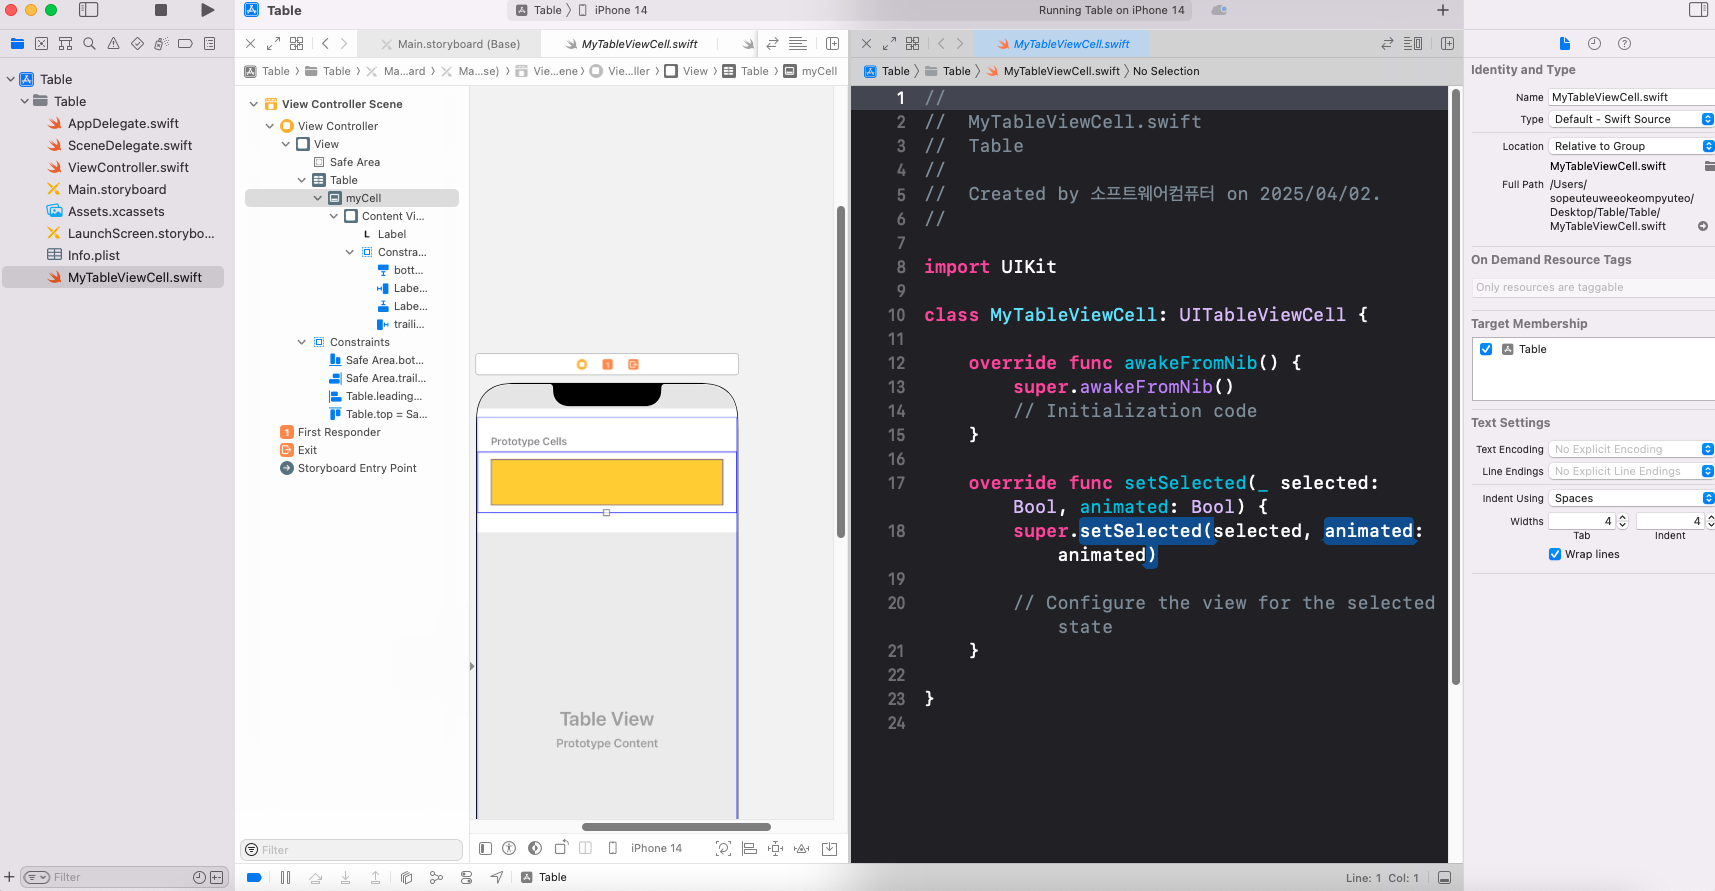
- 원하는 어시스턴트가 나오지 않는 경우 , alt+원하는파일 클릭
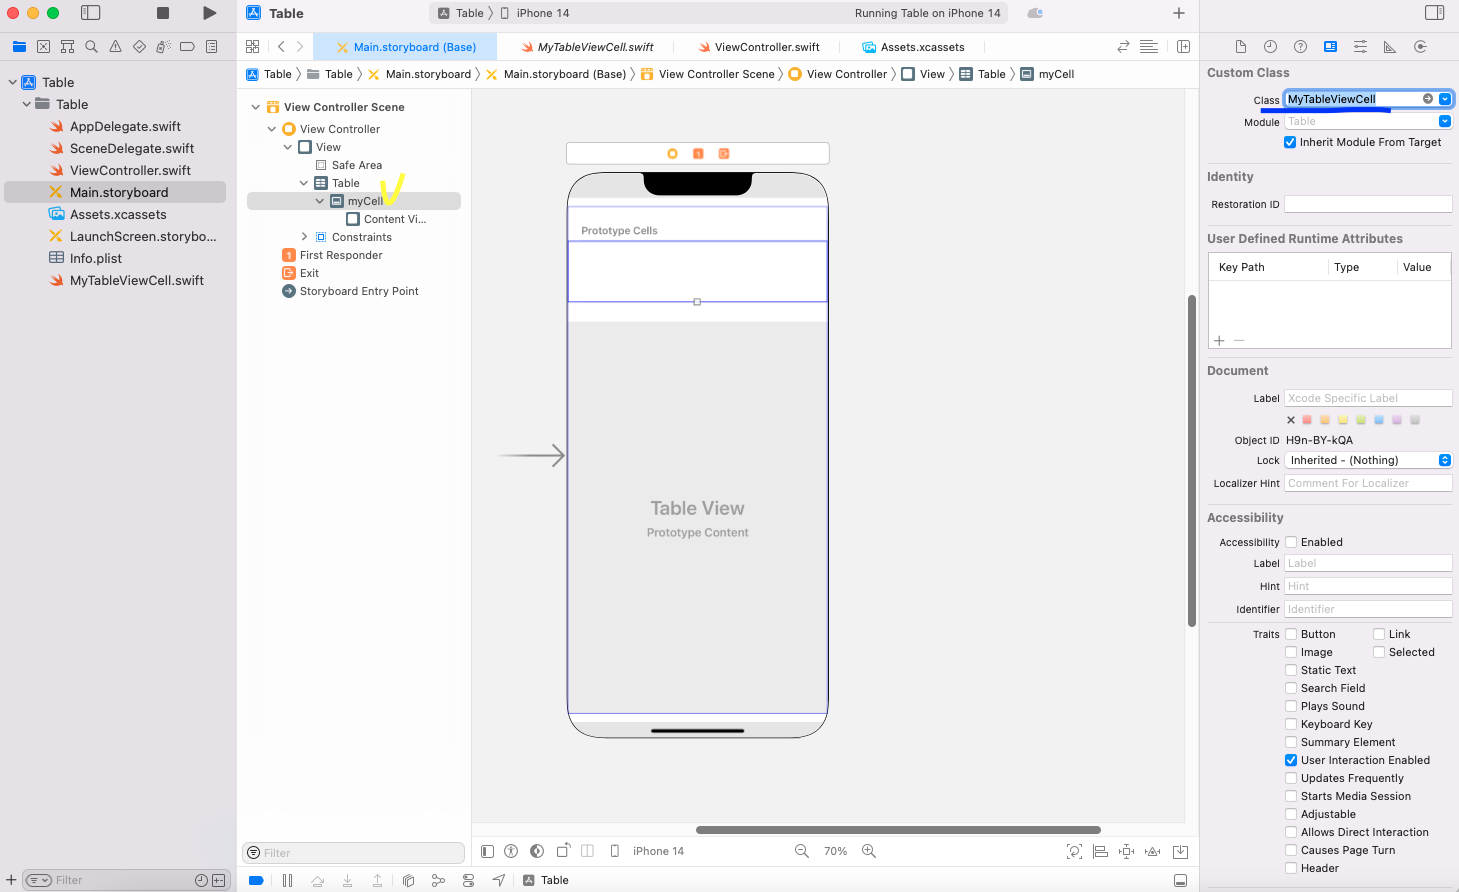
- myLable을 쓰려는데 접근할 수가 없음
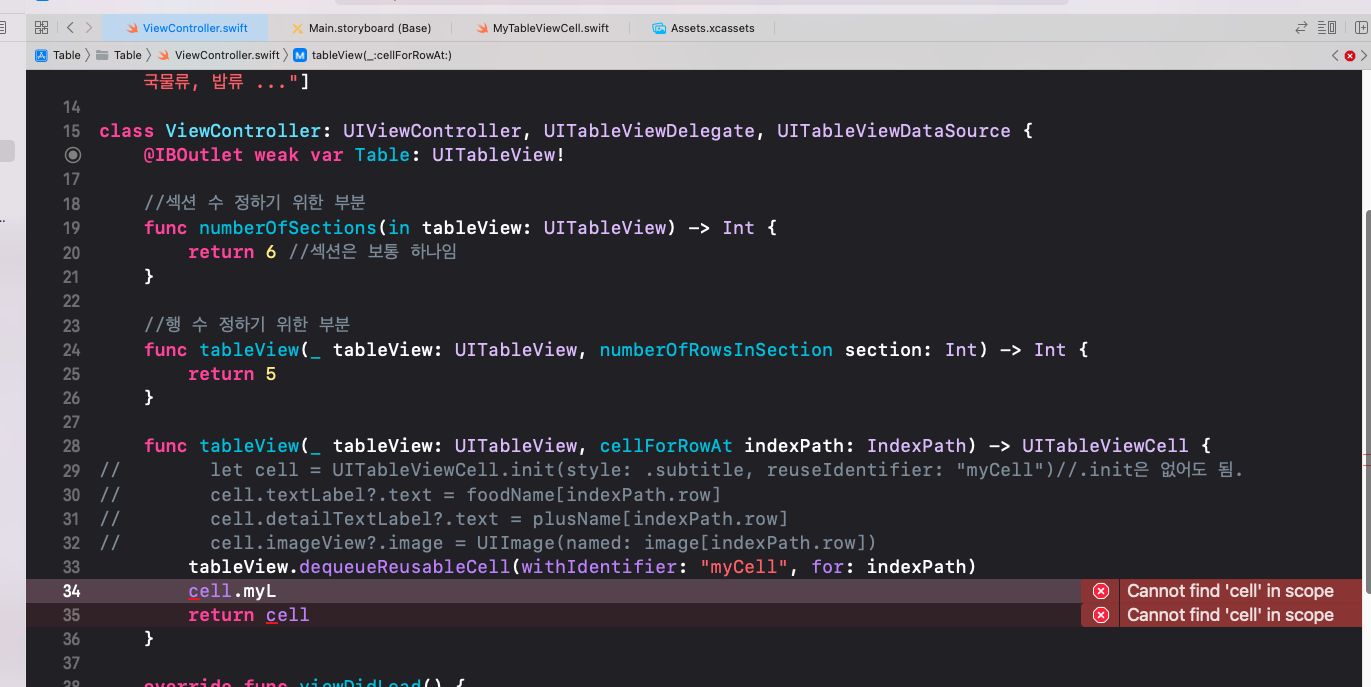
- return형이 UITableViewCell형임.
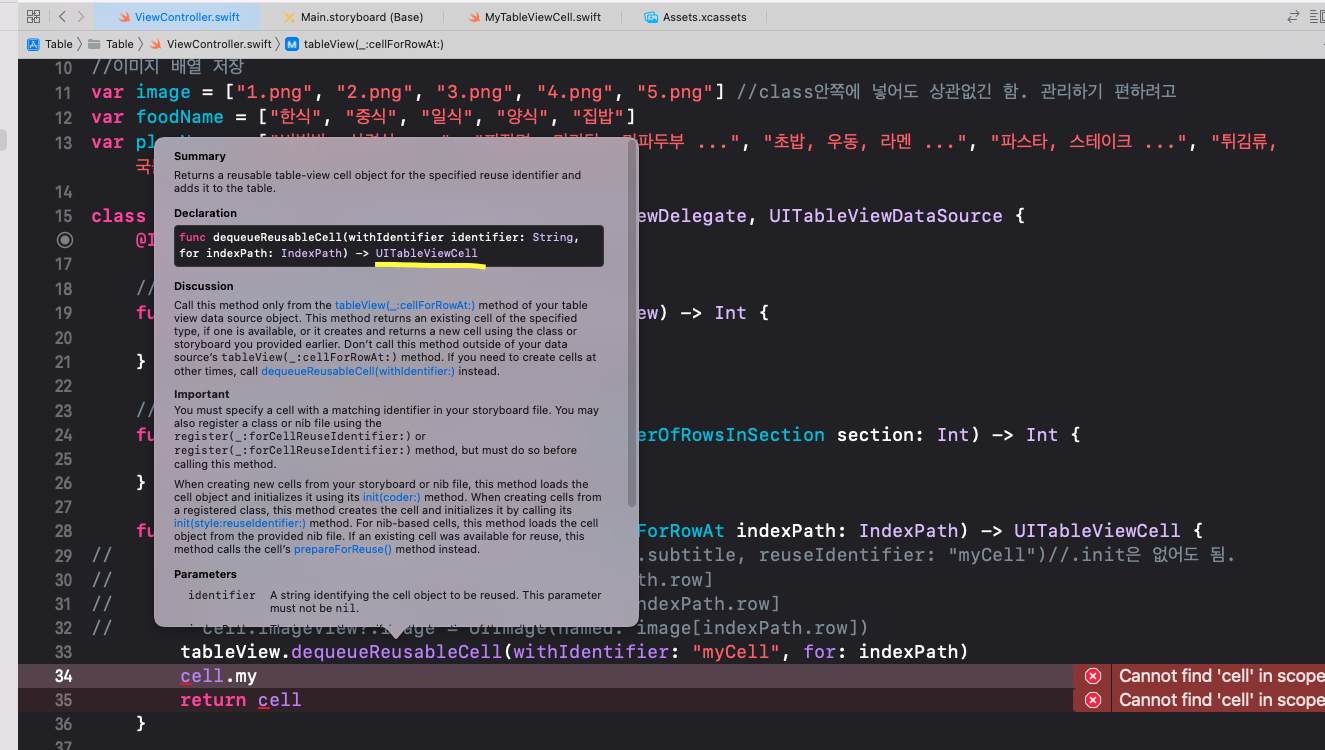
cell의 myLabel에 접근하고 싶은데 부모인 UITableViewCell이 아닌 MyTableViewCell의 프로퍼티이므로
as!나 as?로 다운 캐스팅 해야함
//
//  ViewController.swift
//  Table
//
//  Created by 소프트웨어컴퓨터 on 2025/04/02.
//

import UIKit

//이미지 배열 저장
var image = ["1.png", "2.png", "3.png", "4.png", "5.png"] //class안쪽에 넣어도 상관없긴 함. 관리하기 편하려고
var foodName = ["한식", "중식", "일식", "양식", "집밥"]
var plusName = ["비빔밥, 삼겹살 ...", "짜장면, 마라탕, 마파두부 ...", "초밥, 우동, 라멘 ...", "파스타, 스테이크 ...", "튀김류, 국물류, 밥류 ..."]

class ViewController: UIViewController, UITableViewDelegate, UITableViewDataSource {
    @IBOutlet weak var Table: UITableView!

    //섹션 수 정하기 위한 부분
    func numberOfSections(in tableView: UITableView) -> Int {
        return 6 //섹션은 보통 하나임
    }

    //행 수 정하기 위한 부분
    func tableView(_ tableView: UITableView, numberOfRowsInSection section: Int) -> Int {
        return 5
    }

    func tableView(_ tableView: UITableView, cellForRowAt indexPath: IndexPath) -> UITableViewCell {
//        let cell = UITableViewCell.init(style: .subtitle, reuseIdentifier: "myCell")//.init은 없어도 됨.
//        cell.textLabel?.text = foodName[indexPath.row]
//        cell.detailTextLabel?.text = plusName[indexPath.row]
//        cell.imageView?.image = UIImage(named: image[indexPath.row])
        let cell = tableView.dequeueReusableCell(withIdentifier: "myCell", for: indexPath) as! MyTableViewCell //다운캐스팅
        cell.myLable.text = "aaaa"
        return cell
    }

    override func viewDidLoad() {
        super.viewDidLoad()
        Table.delegate = self
        Table.dataSource = self
    }


}
- 이름 뜨게하기
//
//  ViewController.swift
//  Table
//
//  Created by 소프트웨어컴퓨터 on 2025/04/02.
//

import UIKit

//이미지 배열 저장
var image = ["1.png", "2.png", "3.png", "4.png", "5.png"] //class안쪽에 넣어도 상관없긴 함. 관리하기 편하려고
var foodName = ["한식", "중식", "일식", "양식", "집밥"]
var plusName = ["비빔밥, 삼겹살 ...", "짜장면, 마라탕, 마파두부 ...", "초밥, 우동, 라멘 ...", "파스타, 스테이크 ...", "튀김류, 국물류, 밥류 ..."]

class ViewController: UIViewController, UITableViewDelegate, UITableViewDataSource {
    @IBOutlet weak var Table: UITableView!

    //섹션 수 정하기 위한 부분
    func numberOfSections(in tableView: UITableView) -> Int {
        return 6 //섹션은 보통 하나임
    }

    //행 수 정하기 위한 부분
    func tableView(_ tableView: UITableView, numberOfRowsInSection section: Int) -> Int {
        return 5
    }

    func tableView(_ tableView: UITableView, cellForRowAt indexPath: IndexPath) -> UITableViewCell {
//        let cell = UITableViewCell.init(style: .subtitle, reuseIdentifier: "myCell")//.init은 없어도 됨.
//        cell.textLabel?.text = foodName[indexPath.row]
//        cell.detailTextLabel?.text = plusName[indexPath.row]
//        cell.imageView?.image = UIImage(named: image[indexPath.row])
        let cell = tableView.dequeueReusableCell(withIdentifier: "myCell", for: indexPath) as! MyTableViewCell //다운캐스팅
        cell.myLable.text = foodName[indexPath.row]
        return cell
    }

    override func viewDidLoad() {
        super.viewDidLoad()
        Table.delegate = self
        Table.dataSource = self
    }


}
-화면에 출력되는 부분을 알 수 있는 코드
cellForRowAt
//
//  ViewController.swift
//  Table
//
//  Created by 소프트웨어컴퓨터 on 2025/04/02.
//

import UIKit

//이미지 배열 저장
var image = ["1.png", "2.png", "3.png", "4.png", "5.png"] //class안쪽에 넣어도 상관없긴 함. 관리하기 편하려고
var foodName = ["한식", "중식", "일식", "양식", "집밥"]
var plusName = ["비빔밥, 삼겹살 ...", "짜장면, 마라탕, 마파두부 ...", "초밥, 우동, 라멘 ...", "파스타, 스테이크 ...", "튀김류, 국물류, 밥류 ..."]

class ViewController: UIViewController, UITableViewDelegate, UITableViewDataSource {
    @IBOutlet weak var Table: UITableView!

    //섹션 수 정하기 위한 부분
    func numberOfSections(in tableView: UITableView) -> Int {
        return 6 //섹션은 보통 하나임
    }

    //행 수 정하기 위한 부분
    func tableView(_ tableView: UITableView, numberOfRowsInSection section: Int) -> Int {
        return 5
    }

    func tableView(_ tableView: UITableView, cellForRowAt indexPath: IndexPath) -> UITableViewCell {
//        let cell = UITableViewCell.init(style: .subtitle, reuseIdentifier: "myCell")//.init은 없어도 됨.
//        cell.textLabel?.text = foodName[indexPath.row]
//        cell.detailTextLabel?.text = plusName[indexPath.row]
//        cell.imageView?.image = UIImage(named: image[indexPath.row])
        let cell = tableView.dequeueReusableCell(withIdentifier: "myCell", for: indexPath) as! MyTableViewCell //다운캐스팅
        cell.myLable.text = foodName[indexPath.row]
        print(indexPath.description) //화면에 보여주는 부분이 뭔지 프롬프터에 출력하는 소스. 화면 드래그하면 출력되는 것도 바뀜
        return cell
    }

    override func viewDidLoad() {
        super.viewDidLoad()
        Table.delegate = self
        Table.dataSource = self
    }


}
- 코드 눌렀을 때 반응하는 부분
func tableView(_ tableView: UITableView, didSelectRowAt indexPath: IndexPath) {
        print(indexPath.description)
    } //didSeletRowAt은 셀을 눌렀을 때, 반응하는 부분
//
//  ViewController.swift
//  Table
//
//  Created by 소프트웨어컴퓨터 on 2025/04/02.
//

import UIKit

//이미지 배열 저장
var image = ["1.png", "2.png", "3.png", "4.png", "5.png"] //class안쪽에 넣어도 상관없긴 함. 관리하기 편하려고
var foodName = ["한식", "중식", "일식", "양식", "집밥"]
var plusName = ["비빔밥, 삼겹살 ...", "짜장면, 마라탕, 마파두부 ...", "초밥, 우동, 라멘 ...", "파스타, 스테이크 ...", "튀김류, 국물류, 밥류 ..."]

class ViewController: UIViewController, UITableViewDelegate, UITableViewDataSource {
    @IBOutlet weak var Table: UITableView!

    //섹션 수 정하기 위한 부분
    func numberOfSections(in tableView: UITableView) -> Int {
        return 6 //섹션은 보통 하나임
    }

    //행 수 정하기 위한 부분
    func tableView(_ tableView: UITableView, numberOfRowsInSection section: Int) -> Int {
        return 5
    }

    func tableView(_ tableView: UITableView, didSelectRowAt indexPath: IndexPath) {
        print(indexPath.description)
    } //didSeletRowAt은 셀을 눌렀을 때, 반응하는 부분

    func tableView(_ tableView: UITableView, cellForRowAt indexPath: IndexPath) -> UITableViewCell {
//        let cell = UITableViewCell.init(style: .subtitle, reuseIdentifier: "myCell")//.init은 없어도 됨.
//        cell.textLabel?.text = foodName[indexPath.row]
//        cell.detailTextLabel?.text = plusName[indexPath.row]
//        cell.imageView?.image = UIImage(named: image[indexPath.row])
        let cell = tableView.dequeueReusableCell(withIdentifier: "myCell", for: indexPath) as! MyTableViewCell //다운캐스팅
        cell.myLable.text = foodName[indexPath.row]
        //print(indexPath.description) //화면에 보여주는 부분이 뭔지 프롬프터에 출력하는 소스. 화면 드래그하면 출력되는 것도 바뀜
        return cell
    }

    override func viewDidLoad() {
        super.viewDidLoad()
        Table.delegate = self
        Table.dataSource = self
    }


}
- 아까처럼 이미지도 띄우기 (메인에 이미지 부분 넣고 마이어쩌구에 이미지부분 연결시킨 후 뷰컨트롤러 와서 코드 추가)
//
//  ViewController.swift
//  Table
//
//  Created by 소프트웨어컴퓨터 on 2025/04/02.
//

import UIKit

//이미지 배열 저장
var image = ["1.png", "2.png", "3.png", "4.png", "5.png"] //class안쪽에 넣어도 상관없긴 함. 관리하기 편하려고
var foodName = ["한식", "중식", "일식", "양식", "집밥"]
var plusName = ["비빔밥, 삼겹살 ...", "짜장면, 마라탕, 마파두부 ...", "초밥, 우동, 라멘 ...", "파스타, 스테이크 ...", "튀김류, 국물류, 밥류 ..."]

class ViewController: UIViewController, UITableViewDelegate, UITableViewDataSource {
    @IBOutlet weak var Table: UITableView!

    //섹션 수 정하기 위한 부분
    func numberOfSections(in tableView: UITableView) -> Int {
        return 6 //섹션은 보통 하나임
    }

    //행 수 정하기 위한 부분
    func tableView(_ tableView: UITableView, numberOfRowsInSection section: Int) -> Int {
        return 5
    }

    func tableView(_ tableView: UITableView, didSelectRowAt indexPath: IndexPath) {
        print(indexPath.description)
    } //didSeletRowAt은 셀을 눌렀을 때, 반응하는 부분

    func tableView(_ tableView: UITableView, cellForRowAt indexPath: IndexPath) -> UITableViewCell {
//        let cell = UITableViewCell.init(style: .subtitle, reuseIdentifier: "myCell")//.init은 없어도 됨.
//        cell.textLabel?.text = foodName[indexPath.row]
//        cell.detailTextLabel?.text = plusName[indexPath.row]
//        cell.imageView?.image = UIImage(named: image[indexPath.row])
        let cell = tableView.dequeueReusableCell(withIdentifier: "myCell", for: indexPath) as! MyTableViewCell //다운캐스팅
        cell.myLable.text = foodName[indexPath.row]
        cell.myImage.image = UIImage(named: image[indexPath.row])
        //print(indexPath.description) //화면에 보여주는 부분이 뭔지 프롬프터에 출력하는 소스. 화면 드래그하면 출력되는 것도 바뀜
        return cell
    }

    override func viewDidLoad() {
        super.viewDidLoad()
        Table.delegate = self
        Table.dataSource = self
    }


}